How to Upload in Bulk on Box
Overview
Use bulk upload to add new members to your digital workplace and update data about existing members. Majority uploading requires that you have your membership information in a comma-separated text file.
Considerations and caveats
Who can do this
- Workplace Administrators
- Enterprise Administrators
- Members of groups with the Perform Majority User Uploads Office
Notifications
Adding members with bulk upload does not notify them of their membership to your digital workplace. Consider notifying these members in one of the following ways:
- Send members a broadcast.
- Create a wiki article that contains new member instructions and a welcome message.
- When bulk uploading members, add them to a group that is dedicated to new members.
- Circulate the wiki article to your new members group.
- Remove members from the new members group subsequently the circulate.
- E-mail members outside of your digital workplace.
Password security
For digital workplaces that utilise Igloo Authentication, the bulk upload requires that new members have a password assigned to them.After adding a member, information technology is best totrigger a password reset or inquire them to follow theforgotten password reset steps to change their password to something that simply they know.
Member Export
You can run a fellow member consign to create a spreadsheet that contains existing fellow member profile information and group affiliations. However, exist aware that the headers in this report are not valid headers for a bulk upload.
Member account guidelines
For data about the responsibilities associated with managing accounts, see Member account guidelines.
How to create the majority upload file
- Click the
Control Panel cog on the Userbar.
- Under Membership, select Manage Members.
- Click Majority Fellow member Upload.
- Select all of the text in the CSV Data text box (ctrl-a), and re-create information technology (ctrl-c).
- On your computer, open a new workbook in Excel.
- Paste the text copied in step four into jail cell A1 of the workbook.
- With jail cell A1 all the same selected, click the Data tab, and then click Text to Columns.
- In the Text to Columns Wizard, select Delimited and and so click Next.
- In the Text to Columns Wizard, under Delimiters, select only Comma and then click Finish
- Salvage this file equally a .csv.
How to fill out the bulk upload file
Within the bulk upload file, every row later the initial header row corresponds to a member, and the columns represent to contour information about that member. Values in the header row stand for to contour fields inside your digital workplace and are case sensitive.
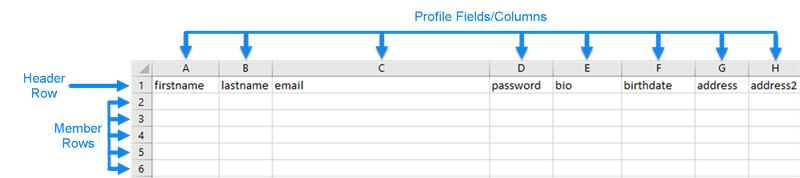
1. Organizing your columns
When doing a bulk upload, y'all should remove any profile field columns that you are not planning to brand changes to. This makes the file easier to navigate and reduces potential sources of errors.
When removing columns from your file, do non remove the following mandatory columns:
- firstname
- lastname
- password/customIdentifier (customIdentifier replaces password if your digital workplace uses SAML or LDAP Hallmark )
After removing unused columns, you tin so reorder any of the remaining columns for your convenience.
two. Inbound mandatory member data
For each member that y'all want to add or change, you must enter values in the following columns:
- firstname
- lastname
- electronic mail
Additionally, when adding a new member to your digital workplace and the password field is present (your workplace uses Igloo Authentication), you must enter a value for the password. For existing members, you lot can leave this field blank, still, the column itself must be present in the file. Entering a value for an existing member does not change their password. To reset a fellow member's password see:
- Irresolute your Igloo password
- Resetting a member'south password
- Resetting a forgotten password
Below is an instance of the completed mandatory fields for a digital workplace that uses Igloo Authentication. In this case, passwords are entered for new members Stacy, Walter, and Antonia.

The customIdentifier field that tin supercede the countersign field (for workplaces that employ SAML Authentication) does non crave yous to populate it regardless of whether the member is new or not. Notwithstanding, you must still include this field when information technology's present.

3. (Optional) Inbound profile information
For each member, you can add additional profile information in the remaining columns. For a list of the default profile fields, run into Profile fields reference table.
Since the bulk upload uses commas to distinguish between the unlike fields, y'all should wrap the prison cell's contents in quotes any time you want to use a comma within a prison cell. This prevents the comma in the text from interfering with the bulk upload file's comma separation between profile fields. For case, when entering data into the associations field:
"APA, CPA, Academy of Waterloo"
The profile field information that yous enter into the bulk upload file will overwrite whatever existing information in that profile field. Go out a jail cell blank to avert changing it.
4. (Optional) Clearing profile information
For each existing member, rather than add together or alter profile data yous can clear information from a profile field. To do so, enter $Articulate into the corresponding cell of the file.
For example, the below paradigm shows $Clear beingness used to clear the bio field for Stacy, Walter, and Antonia, also as the birthdate field for Walter.

5. (Optional) Entering what groups to add members to
For each member, you can enter group names in the groupsToAdd column to specify which already existing grouping(due south) the bulk upload should add the member to.
Proceed in listen these formating rules when inbound this information:
- Group names are not instance sensitive.
- When inbound multiple groups, separate the names using the pipe graphic symbol (|).
- When adding a member to a space group, prefix the group name with the infinite name followed by the tilde character (~).
- You do not demand to include spaces around the | and ~ delimiters.
- You lot can replace the | and ~ delimiters with different characters; nevertheless, you must then enter them into the appropriate fields when performing the bulk upload. Meet steps eight and 9 of "How to run the majority upload with your file" constitute below.
Below is an example of adding members to member groups and space groups.
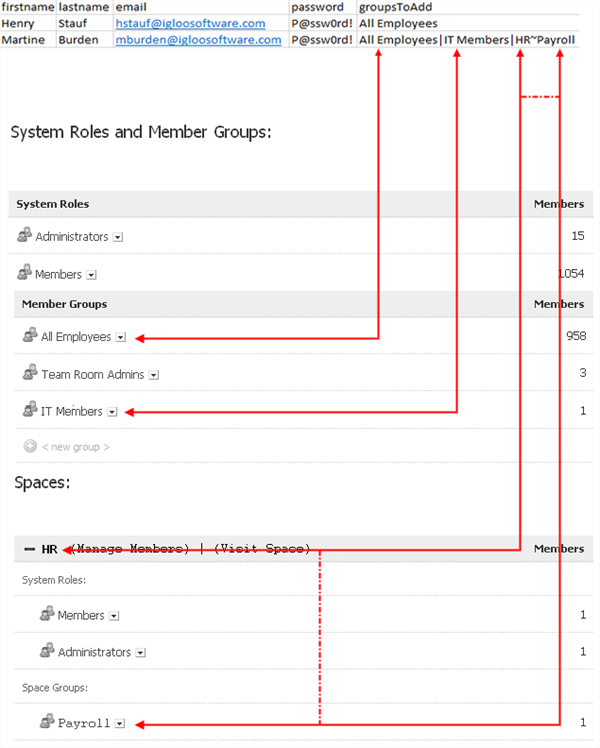
Other group names that you can utilize are:
- To add together a member as a space administrator, employ: Space Name~Space Admins(ex. Hour~Space Admins)
- To add a member to a space use: Space Name~Space Members (ex. HR~Space Members)
- To add a fellow member as workplace administrator use: Administrators
Members added with the bulk upload volition automatically be added to the system group All Members. Similarly, calculation a fellow member as a space ambassador or a group within a infinite too adds them as a member of the space.
half-dozen. (Optional) Removing members from groups
For each existing member, yous can remove them from groups using the groupsToRemove column. Follow the same rules outlined in step 5. "(Optional) Inbound what groups to add together members to".
How to run the bulk upload with your file
- Save a copy of the bulk upload file equally a .csv file.
- Open the .csv file in a basic text editor such as Notepad.
- In the text editor, select all the text (ctrl-a) and then copy information technology (ctrl-c).
- In your web browser, go to your digital workplace's Majority Member Upload page.
- Open the control panel
- Select Manage Members
- Click Bulk Member Upload
- Delete all the text from the CSV Data textbox.
- Paste the text that you copied in footstep 3 into the CSV Data textbox.
- (Optional) Replace the text in the Championship text box
- (Optional) If y'all did not use the default tilde character (~) as a Space Delimeter, enter the character that you did use into the Infinite Delimiter text box.
- (Optional) If y'all did not use the default pipage character (|) as a Group Delimeter, enter the character that you did use into the Group Delimeter text box.
- Click Upload Members.
Post upload
Your bulk upload may take a few minutes to process. During this time, you tin can find its status in the Pending Bulk Fellow member Uploads table. If the bulk upload file contains any errors, the upload halts, and the likely sources of error will brandish under the bulk upload input text box. Correcting these errors frequently involves editing the bulk upload file and then re-uploading it.

Source: https://customercare.igloosoftware.com/support/knowledgebase/all_articles/articles/bulk_upload
0 Response to "How to Upload in Bulk on Box"
Post a Comment